Pages

Tuesday, April 1, 2014

Making 6 "MERRY CHRISTMAS" cards for the month of April.. Details/Measurements Included


I made the card above last night... Merry Christmas Card...    today I made 6 more..  here is how I did it.

This is going to be a long post..   Lots of pictures.   


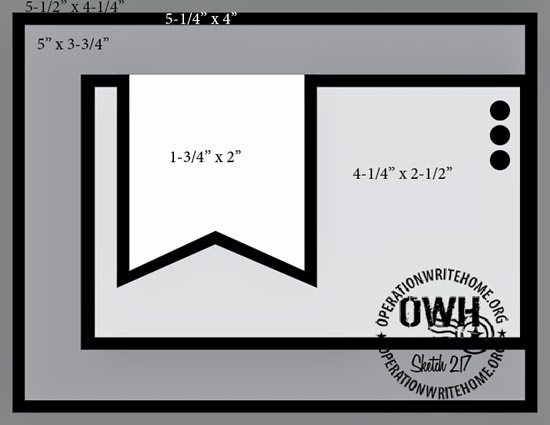
Here is the sketch I used ~ which happens to be an OWH #218 Sketch:


First I cut all my layers..   After I make one card that I like and want to make more, I always start cutting all the layers.  I knew I had a lot to do this afternoon and so I opted to make just 6, but I usually make at least 12-20 more more.. I usually always use these same steps and find the cards get done rather quickly.


Just a tip..  when I was cutting the strips..  after I've cut them on the short side.. I put several of them in the trimmer and make one cut to cut them on the long side.  I don't always do this, because sometimes I forget.. but today I remembered.


After cutting everything..  I started with my layers.. and first thing is I score all my card bases.   I use a Scor-Pal.  I have three of these..  two large size ones.. a first edition and then the second.. and my mother bought me this Scor-Buddy and I have made thousands upon thousands of scores with this baby..  my most used tool beside my trimmer and ATG.   If you don't have one of these... I highly recommend getting one. 


I am going to emboss all the shimmery white layers using a Tim Holtz Snow Flurries embossing folder.


I do two at a time..  saves me time and they both emboss nicely.

Just wanted to share a tip...   I recently purchased a Magnetic Platform and removed the top tab off the platform I already owned.. now when I want to use embossing folders, no need to flip the top layer.. just put a clear plate on it, your embossing folder and another clear plate..  saves me so much time.  


 Since there is a lot of nooks and crannies.. I put adhesive around the outer edges and usually a big X in the middle.


Tip.. just wanted to mention this one blue layer..  I had either punched or die cut a circle out of a piece of it and realized I could use it for a layer on one of the cards because there was enough room between the circle edge and the edge of the card stock..  I only put adhesive around the outside of the shimmery layer that went on this one.. I put some adhesive on the blue layer.  This way I didn't have adhesive sticking out the back of the shimmery layer and sticking to everything.  I do this quite often.. especially if my card had a punched out shape or die cut shape and it's in the same color as a layer that will be covered up.  


I was asked the other day how I get my layers straight..   I hold the sides with my fingers.. lining up the bottom and then glancing to see that the top is the same.. then I lay the layer down.. making sure to push down on the left and right side because my fingers can cause the paper to curve a little bit.  


When I am putting adhesive on the layers.. I put it on either all of them at one time.. or if I am making a whole bunch, I usually do them 5-10 at a time..  this makes putting the layers together go much more faster.


Next I stamped all my sentiments onto the shimmery white strips.  I always lay a piece of dark card stock underneath any white layers I am stamping.


I am going to punch the ends of the two layers to make the banner end.. I line up the two layers and punch them at once.. so that they line up when I slide the white layer over a little bit after punching.


After I punched the ends..  I trimmed some of the white layer off.. then adhered it to the blue strip. I then used scissors to trim some off the end.


here is what the sentiment strip looks like after stamping, punching and trimming.


After I have got all my layers together.. it's time to assemble the cards:
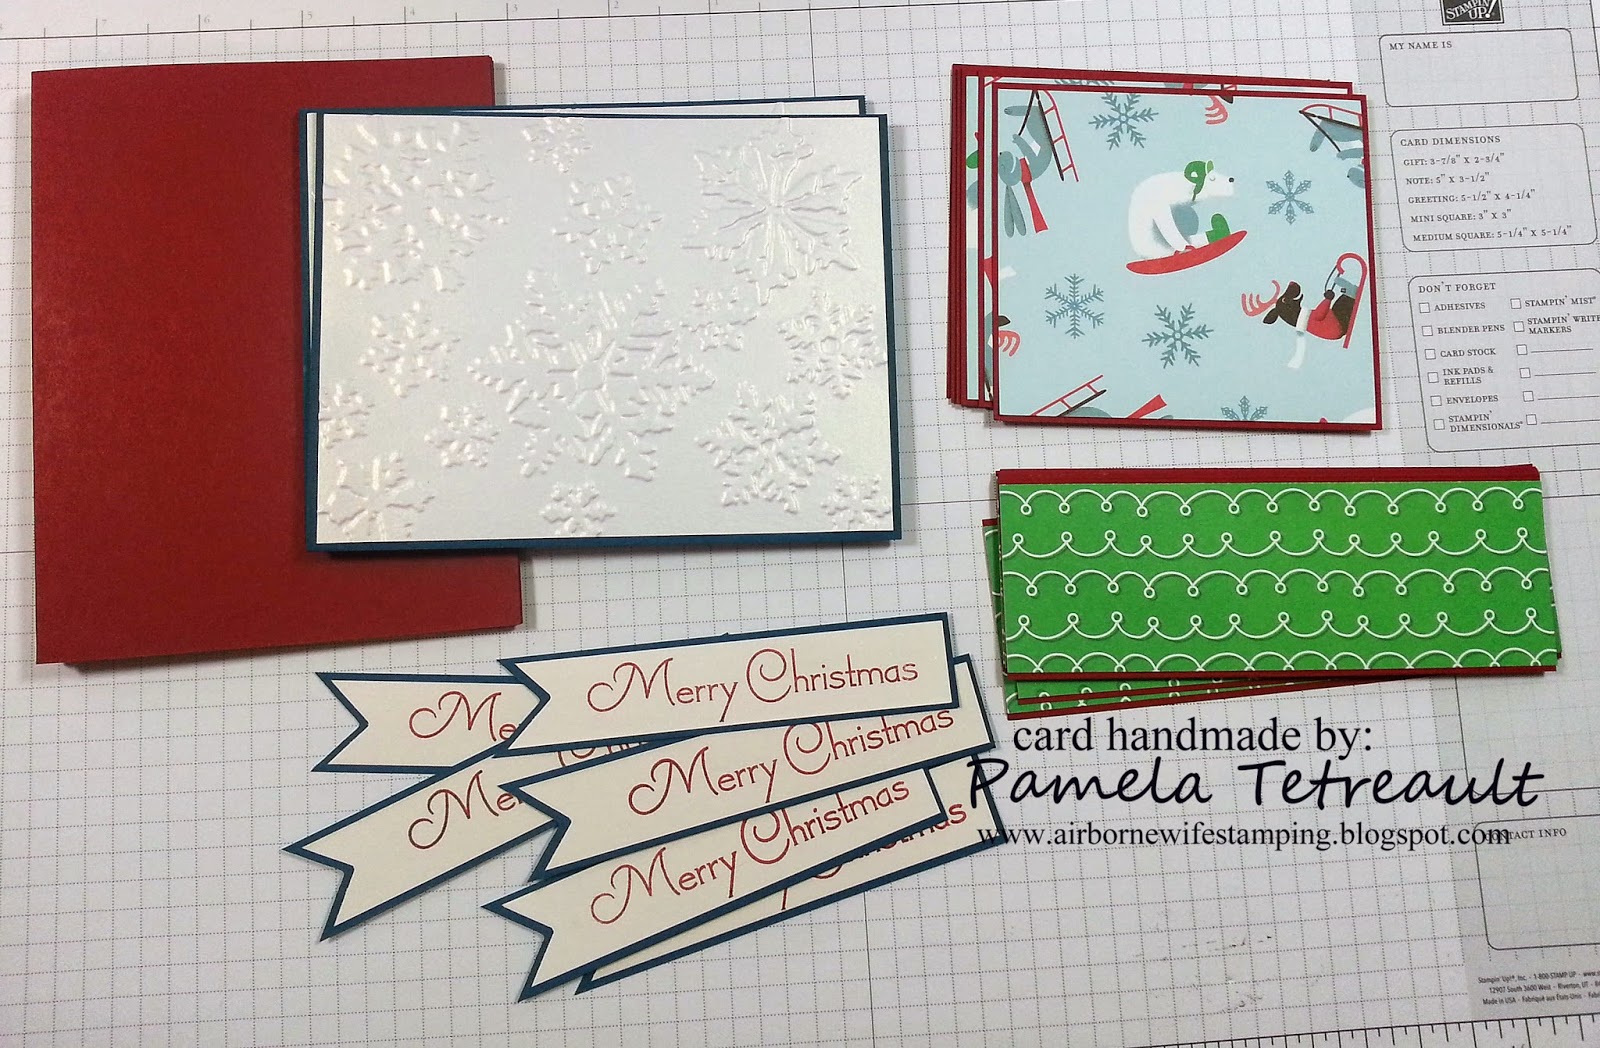


First I adhere the green swirly layered piece on the front of the embossed layer, near the bottom of the layer.  I burnish (rub on it) to make sure it sticks together good.


I put my favorite thing in the crafting world on the back of the square panel..  Dimensionals!!  These happen to be ones from Stampin' UP!  love them things!!!


Then I put the square layer on the card.. more to the right side on the card front.


I move on to the sentiment layers..  I put a dimensional on the banner end and adhesive on the other.


Putting it on the card front..


Next I punch all three holes for the brads.. I punch the hole in the center first and then to the left and right.. usually right then left.


Putting three brads in the holes and adhering the card front to the card base.


and all the cards are complete.       I hope you give it a try.. using any sketch and theme for some cards.


SUPPLIES:

card stock:  Shimmer White, Cherry Cobbler and Midnight Muse
pattern paper:  American Crafts Red Sleigh (scored at Tuesday Morning)
ink:  Cherry Cobbler
stamps:  MFT Christmas
accessories:  Scor-Pal, Tim Holtz Embossing Folder Snow Flurries, Photo Corner Punch, Hole Punch, Red Brads and Dimensionals.


thanks for looking ~


have a great airborne day!
God Bless All Our Military.. each and every one of them

Monday, March 31, 2014

OWH Sketch #218 "MERRY CHRISTMAS" card


This week's sketch on the Operation Write Home Stars & Stamps blog is done after a card I made back in January..  American Bald Eagle "THANKS" card.  


Since tomorrow is April 1st, I thought I'd get a head start on making my 5 Christmas cards for the month..   I made just this one to see if I liked it or not.. and I do, so I'll make a bunch more.. maybe even more than 5.   I did score some packs of red brads not too long ago at Tuesday Morning.  Ever since Hobby Lobby stopped selling in packages of just red brads, I have had a hard time finding them.   

Here is this week's OWH Sketch Challenge #218 layout:


SUPPLIES:

card stock:  White, Shimmer White, Cherry Cobbler and Midnight Muse
pattern paper:  American Crafts Red Sleigh (scored at Tuesday Morning)
ink:  Cherry Cobbler
stamps:  MFT Christmas
accessories:  Scor-Pal, Tim Holtz Embossing Folder Snow Flurries, Photo Corner Punch, Hole Punch, Red Brads and Dimensionals.


thanks for looking ~


have a great airborne day!

God Bless All Our Military.. each and every one of them

CAS(E) this Sketch!: "YOU'RE A SUPERSTAR." card


This afternoon my son played in a golf tournament. He plays on his High School Boys Golf team.  I was going to go to the tournament but it started so late in the afternoon that I had to pick up my daughter when she got out of school, so my husband went.  He shot a 79 and finished 2nd overall.   

When I seen the sketch for this weeks CAS(E) this Sketch, I knew immediately what I was going to make. 

I chose the Red, White and Blue colors because I love all things Patriotic.

Here is this week's CAS(E) this Sketch CTS$70


SUPPLIES:

card stock: Red, White and Blue
stamps:  $1. Michael's "You're A Superstar" stamp
ink: SU Midnight Muse
accessories:  Scor-Pal, Spellbinders Stars and Dimensionals


thanks for looking ~

have a great airborne day!
God Bless All Our Military.. each and every one of them

Saturday, March 29, 2014

MFTWSC169 "YOU MAKE EVERY DAY A HAPPY ONE" card


Tomorrow morning we are heading to Martinsville Speedway in Ridgeway, VA to watch the NASCAR STP 500 race.    I thought I better get busy making a card for this week's MFTWSC tonight or I wouldn't be able to get to it until Tuesday because my son has a golf tournament on Monday.    I grabbed a paper pad that was sitting on my desk, and my card went from there.   

Here is this week's MFTWSC169 sketch layout:


SUPPLIES:

card stock:  Black, White
pattern paper:  Sn@p! Simple Stories Color Vibe
ink: Versafine Black
stamps:  MFT Complimentary Greetings
accessories:  Scor-Pal, MFT Die-namics Well Worn Greetings, Flower & Leaf Trio, Heirloom Label. white brad


thanks for looking ~

have a great airborne day!
God Bless All Our Military.. each and every one of them

Wednesday, March 26, 2014

Quick & Easy Butterfly cards.. set of 32 made in no time at all.


This morning I seen a video by Jennifer McGuire and it reminded me of some cards I made a very, very long time ago.   I decided to make a bunch of these.  I grabbed a bunch of white and black card stock and got cutting.. I ended up cutting enough layers for 32 cards.   I already had the card bases already cut/scored and folded from when my son played basketball.. I used to go to his practice with cut card stock in hand, along with my Scor-Pal and I would score and fold lots and lots of card bases.


Since it was cold last night and this morning as well.. my stamp room was a bit cold, so I decided to do all my stamping on the kitchen counter.   I got Pandora on my laptop playing.. a cold Coke Zero (to the left of the laptop not in pic), my awesome Fiskars ProCision cutter~ which I absolutely LOVE!!!   I have made thousands of cuts with this thing and it cuts as nice today as it did the first day I got it..  worth every single penny I paid for it.


This was my counter after I got into stamping..  I had grabbed a bunch of stamp sets and ink pads from my stamp room and had so much fun making these cards.


Here's how I went about making these cards:

First I cut all my layers..  sorry for the blurry pic.   I cut the white layers at 4" x 5 1/4" and the black layers at 4 1/8" x 5 3/8".     I did four stacks of 8.


I then stamped all the sentiments for each set of 8 cards, using Versafine Black ink..  awesome ink for sentiments.   *the green piece of scrap paper is a piece of card stock I use when stamping on white layers.  I always put a colored piece of card stock under the white layer while stamping ~ so I can align my paper to stamp my sentiment straight.


Next I got to stamping the butterflies.    I did the largest one first.    Ink up the stamp real good..   stamp it once, then twice and then a third time.. I would stamp the butterfly in one direction and then the other way and so on.


Then the smaller butterfly..  doing the same as the large one. Ink up the stamp.. then stamp it once, twice and three time.. alternating it's direction and location on the card stock.


After doing all the stamping for each color.. I would then layer each stamped layer onto a black layer.


 Here are all the layers stamped.. I really like the way the blue and the green turned out.


When I am doing multiples..  in order to get things done more efficiently, I have found that when it's time to do the adhesive on the layers.. I put adhesive on several and then put them all on the card bases..  then do another batch.  This goes much faster then doing them one at a time.  I have tried it both ways and this works so much better for me. I get the "putting together" done much faster this way.


Here are all the stamped layers on the black layers..


here's one of the cards all put together...


And all 32 completed...

here are the stamps and ink pads I used on the cards:


SUPPLIES:

stamps: L-R:   Hero Arts/Sizzix Butterflies (657773), Hero Arts Truly Appreciated (CL380), Hero Arts Antique Engravings (CL383), Hero Arts Made With Love (CL491)
ink:  Versafine Black, Stampin' UP! Gumball Green, Cherry Cobbler, Raspberry Ripple and Midnight Muse
card stock:  Neenah White, Recollections Black


thanks for looking ~


have a great airborne day!

God Bless All Our Military.. each and every one of them

Some new MFT Dies.. and some gifted magnets!!


Today someone gave me a bunch of magnets!! I was about to go buy some more magnetic sheets tomorrow at Lowe's to make some more storage sheets for some new MFT dies I purchased from an eBay seller this past week.  I was tickled to get the magnets and right after dinner I made all the storage sheets for the dies.    Some of the pieces are 7/8" x 2" and I just laid them on the adhesive.   I still have lots more to use.

 I use chipboard, cover it with some 2" wide sticky adhesive and then adhere the magnets to it. I keep all my MFT and Memory Box dies in clear plastic storage bags and hang them on a Hobby Lobby brand of a Clip it Up. All my Spellbinders are in the containers they came in..  they were in some Lifestyle Crafts magnetic books and I took everything out of them..  but my rack was nearly all filled up with the MFT and Memory Box, and I haven't gone back to get another rack, so they sit in a bin.

thanks for looking ~

have a great airborne day!
God Bless All Our Military.. each and every one of them

Sunday, March 23, 2014

OWH #217 "THERE IS NO ONE LIKE YOU" card


Operation Write Home has an awesome sketch this week.    I used one of the Hero Arts ~ OWH Fundraiser stamp sets for this card.  

Here is the sketch I used:


SUPPLIES:

card stock:  Kraft, Neenah Canyon Brown
pattern paper:  Pink Paislee: Prairie Hill (striped paper), Echo Park This & That Charming (blue and print under sentiment)
ink:  SU Early Espresso
stamps:   Hero Arts What a Guy
accessories:  Scor-Pal, Mini Brads, Hole Punch, MFT Die-namics Fishtail Flags Stax and dimensionals


thanks for looking ~

have a great airborne day!
God Bless All Our Military.. each and every one of them

MFTWSC168 "HAVE A GREAT DAY" card

 I cut into one of my new My Mind's Eye Breeze paper pads. I had been searching for more of these pads and recently found some on eBay.  The listing was over, but they hadn't sold. I messaged the seller asking them if they were going to relist them and she did.. yeah!!   I got 5 of these beauties.   I just love the colors on the papers in these pads.


I used this week's MFTWSC168 sketch for this card~ ~ what a great sketch:

SUPPLIES:

card stock:  Black,White, Crushed Curry
pattern paper: MME Breeze
ink:  Versafine Black
stamps:  MFT Clearly Sentimental All Smiles
accessories:  Scor-Pal, MFT Die-namics Circle Stax, Rectangle Stax, Pierced Rectangle Stax, Pierced Circle Stax, Flowers & Leaf trio, Solid Bracket Border, Fishtail Flags, Hole Punch, Brad and Dimensionals


thanks for looking ~

have a great airborne day!
God Bless All Our Military.. each and every one of them

Wednesday, March 19, 2014

Lawn Fawn Stamps & Dies Giveaway!!!


Oh my gosh!!   I just found out on the AllFreePaperCrafts website.. that there is a giveaway going on for these Lawn Fawn stamps and dies.     I would be super excited to win these babies..   I absolutely love the Wish You were Here... love that USA stamp and die!!


thanks for looking ~

have a great airborne day!
God Bless All Our Military.. each and every one of them

Tuesday, March 18, 2014

Lot of 5 Christmas Cards ~ March


Here's my 5 cards for the month of March..   they went together rather quickly.  The only stamping involved was the sentiment.  I used scraps from a paper pad for the pattern paper and the solid paper was already cut and the base was already cut and scored.. yeah me!!   bring on April!!


SUPPLIES:
card stock:   American Crafts Christmas Pad, Kraft, White
pattern paper:  My Mind's Eye Lots & Found Christmas
stamps:  SU Jolly Old Saint Nick
ink:  Versafine Black
accessories:   Scor-Pal, Modern Label Punch, MME Santa embellishments and dimensionals


thanks for looking ~

have a great airborne day!
God Bless All Our Military.. each and every one of them