Pages
▼
Wednesday, April 30, 2014
OWH Sketch Challenge #222 "YOU MEAN THE WORLD TO ME" card
While on a recent shopping trip to Tuesday Morning, I spotted a paper pad that had this fun "globe" paper in it. I knew I wanted to use it when I started on this card, using this week's OWH Sketch Challenge #222.
This is the sketch I used... I turned it on it's side. OWH SKETCH #222:
SUPPLIES:
card stock: Night of Navy, White
pattern paper: American Crafts Amy Tangerine Ready Set Go
ink: Memento Black, VersaMark, Copic Markers
stamps: Lawn Fawn Wish You Were Here
accessories: Scor-Pal, Lawn Fawn Cuts Wish You Were Here, EK Success Scallop Border Punch, White Brads, White Embossing Powder and Dimensionals
thanks for looking ~
have a great airborne day!
God Bless All Our Military.. each and every one of them
Tuesday, April 29, 2014
SSSC217 "MISSING YOU" patriotic USA card
I made this card a couple of nights ago. I was trying to finish it up and wasn't happy with myself because I had die-cut the United States shape, then put dimensionals all over the back of it... without stamping the shapes of the states stamp all over it.. grrrrr!!! I laid it on my desk and forgot about it until tonight when I was going to sit down and make something. The weather here in NC isn't all that great tonight, so I didn't make it back to my desk. I really hope that the bad weather just goes away... it has caused enough pain this past week for a lifetime in some parts of the country. Prayers for those affected by the storms.
I used this week's SSSC217 for my card ~ I turned the sketch:
SUPPLIES:
card stock: white, Cherry Cobbler, Night of Navy
pattern paper: American Crafts Pebbles Americana
stamps: Lawn Fawn Wish You Were Here
ink: Versafine black
accessories: Lawn Fawn Cuts Wish You Were Here, Scor-Pal, MFT Fishtail Flags Stax, Spellbinders Stars, MFT Circle Stax and Dimensionals
thanks for looking ~
have a great airborne day!
God Bless All Our Military.. each and every one of them
Thursday, April 24, 2014
OWH Sketch Challenge #221 "HAPPY TRAILS" card
While in TN last week, we went to my favorite scrapbook/stamp store. I got several Lawn Fawn stamp sets and matching dies. I used one of the sets on my card tonight.
Here is this week's OWH SKETCH CHALLENGE #221 SKETCH:
SUPPLIES:
card stock: Tangerine Tango, Midnight Muse, Cream, White
pattern paper: MME Lime Twist~ Out of the Blue
stamps: Lawn Fawn Happy Trails
ink: Memento Black
accessories: Scor-Pal, Lawn Fawn Lawn Cuts Happy Trails dies and dimensionals
thanks for looking ~
have a great airborne day!
God Bless All Our Military.. each and every one of them
Wednesday, April 23, 2014
MFTWSC173 "LOVE YOU! LOVE ME." card
This week's MFTWSC173 sketch is a lot of fun.. reminds me of this week's SSSC216 sketch.. and I liked it too!
I used some paper from one of my favorite My Mind's Eye paper pads "LOVE ME".. I am not a fan of anything pink, but sure do like this paper.
SUPPLIES:
card stock: vanilla cream, black
pattern paper: MME Love Me
ink: Versafine Black
stamps: MFT More Essential Sayings
accessories: Scor-Pal, MFT heart dies, MFT banner dies, MFT Circle Stax dies and dimensionals
thanks for looking ~
have a great airborne day!
God Bless All Our Military.. each and every one of them
Tuesday, April 22, 2014
SSSC216 "OH HAPPY DAY" card *with measurements
What a fun sketch this week's Sweet Sunday Sketch Challenge is. I pulled out my new Lawn Fawn Hello Sunshine stamp set, matching paper pad and Spring Showers dies.
MEASUREMENTS:
card base: 5 1/2" x 8 1/2" scored at 4 1/4"
black layer: 5 3/8" x 4 1/8"
pattern layer: 5 1/4" x 4"
yellow banner: 1" wide.. I didn't measure how long it was.. I cut the yellow and the black strip (1 1/8" wide) and then used my photo corner punch to make the banner end.. then eyeballed the yellow strip, cut it, then layered it on the black layer and then cut it. I think I left 1/4" on each end of the banner, in from the pattern piece edge.
black layer: 3/8" x 3 3/4"
pink strips: 1/2" x 3 5/8"
square piece:
black layer: 3 1/8" x 3 1/8"
pattern layer: 3" x 3"
Here is this week's SSSC216 sketch:
SUPPLIES:
card stock: white, black
pattern paper: Lawn Fawn Hello Sunshine paper pad
stamps: Lawn Fawn Hello Sunshine
accessories: Scor-Pal, Circle Punches, Lawn Fawn Spring Showers dies, Photo Corner Punch and Dimensionals
thanks for looking ~
have a great airborne day!
God Bless All Our Military.. each and every one of them
Monday, April 21, 2014
MFTWSC172 "I'VE BEEN MISSING YOU" card
Here's my card for this week's MFT Wednesday Sketch Challenge #172. I pulled out a set I haven't used in a very long time.
I haven't stamped in over a week as I was in Tennessee with my family, my mom and a good friend both had Knee Replacement Surgery. One had it done on Monday and the other on Friday. They both are doing good and are home now.
here's this week's MFTWSC172 sketch:
I flipped the sketch for my card:
Supplies:
card stock: black, cream
pattern paper: 7 Gypsies Venice
stamps: MFT You're My Type
ink: Memento Black ink
accessories: Scor-Pal, MFT You're My Type die, Photo Corner Punch and Dimensionals
thanks for looking ~
have a great airborne day!
God Bless All Our Military.. each and every one of them
Sunday, April 13, 2014
MFTWSC171 "THERE IS SUNSHINE IN MY SOUL FOR YOU!" card
I used this week's MFTWSC171 sketch layout for my card. It went together rather quickly.. but was a lot of fun to make. I cut into my new Lawn Fawn Hello Sunshine paper pad for this one.
SUPPLIES:
card stock: Kraft, White, Black
pattern paper: Lawn Fawn Hello Sunshine
ink: Versafine Black, Crushed Curry
stamps: MFT Cheerful Blessings
accessories: Scor-Pal, MFT Sun die, Circle punch, sponge, Paper Piercer, Mini Black Brads and Dimensionals
thanks for looking ~
have a great airborne day!
God Bless All Our Military.. each and every one of them
Wednesday, April 9, 2014
SSSC214 "HELLO" card and a new printer.
About a week and a half ago.. maybe two, I seen a new Echo Park digital paper pack called Summer Adventure, when I opened the website up, I seen another one called Independence Day. I purchased both of the digital kits.. then set out to find a new printer.
We have an old HP Laserjet that prints in black ink only.. and a color printer, but only use it for the copier/scanner, so I went to see about buying a new HP Color Laserjet. I had one in my cart, the extra toners and was ready to checkout and thought I should call HP first. The guy asked by I wanted a Laserjet and I told him that I bought one from them years ago and loved it and the fact that the ink toner lasts a very long time. He mentioned a different printer with high yield cartridges and the ink was less expensive.. so I read some reviews on the HP Officejet Pro 8600 and made my purchase. We are members of the HP EPP program where we get a discounted price because my husband is in the Army/Government Employee. I ordered the printer and ink (which I got for even less using some other coupon discount codes ~ love that!) on a Friday and it arrived on Tuesday (of last week).. free shipping!!! love that too!!
I didn't get a chance to set it up until Sunday.. because the NASCAR race wasn't on I had some time. I didn't print anything until today, so I thought I'd give it a whirl and I printed off one of the papers and the "hello" wording.
I seen the SSSC214 sketch laying on my desk.. and the sketch was perfect to use with my newly printed items.
SUPPLIES:
card stock: Night of Navy, White, Riding Hood Red
pattern paper: Echo Park Digital Summer Adventure Kit
ink: printer
accessories: Scor-Pal, Embossing Folder, Riding Hood Red Ribbon and Dimensionals
thanks for looking ~
have a great airborne day!
God Bless All Our Military.. each and every one of them
Monday, April 7, 2014
MFTWSC170 "WORLD'S GREATEST" ALL-STAR DAD card
My son had a golf tournament today and my daughter and I went to ride along and watch him play. We drove through a rain storm to get to the course he was to play at.. it wasn't raining when we got to it and the lady at the gate said that it had only rained a little since morning.. we had rain on and off again throughout the tournament and when they had three holes left to play.. it was coming down pretty good and we were hearing thunder, so it was called off. I got home and then ran into town with my husband, went to eat and then came home.. I knew if I didn't get this card made tonight, I wouldn't get it done tomorrow because there is another tournament and I am going to it as well. I did manage to get it made.. and now I am taking myself to bed.. as I am exhausted.
supplies:
card stock: Kraft, black
pattern paper: Trinity Paper Arts Making The Team Jerseys and Playbook
ink: Versafine Black
stamps: MFT Masculine Graphic TShirt, MFT Jersey
accessories: Scor-Pal, silver brads, hole punch, Dimensionals, MFT Jersey Die-namic and MFT Sentiment Strips Die-namics.
thanks for looking ~
have a great airborne day!
God Bless All Our Military.. each and every one of them
Here is the sketch I used.. this week's MFTWSC170:
supplies:
card stock: Kraft, black
pattern paper: Trinity Paper Arts Making The Team Jerseys and Playbook
ink: Versafine Black
stamps: MFT Masculine Graphic TShirt, MFT Jersey
accessories: Scor-Pal, silver brads, hole punch, Dimensionals, MFT Jersey Die-namic and MFT Sentiment Strips Die-namics.
thanks for looking ~
have a great airborne day!
God Bless All Our Military.. each and every one of them
Friday, April 4, 2014
SSSC213 "I LOVE YOUR SMILE" card
Today I did something that I hadn't done in an extremely long time... I bought a 12 x 12 paper pad.. yikes! I REALLY, REALLY, REALLY, REALLY, REALLY, REALLY.. you get the idea.. DO NOT need any more paper.. at all!!.. ever!! ever, ever!!! but sure enough, I couldn't resist the urge and bought one. It's from Hobby Lobby, part of their Paper Studios pads and is called Cosmic Whammy.
When I sat down earlier to make a card using this week's Sweet Sunday Sketch Challenge #213.. I for sure wanted to cut into this paper and make a card.. and this is what I came up with. ((pic above))
I actually had punched out another part of the sheet of paper that this funny character came from.. it had two aliens on it.. but I was in a hurry trying to use a black marker on the edges.. and bam! I got black marker on the front.. so I tossed it aside and punched out something else. That was the first boo boo on the card..... then after getting everything all ready to put together.. I went ahead and adhered the layers with the embossed polka dotted top layer on the pattern piece.. and had ink on my finger, didn't realize it and smeared it on the paper.. yikes! then I grabbed a paper towel.. that has been used and had ink on it... tried wiping it and smeared it more.. I took a knife and ran it under the card stock to pull the layers up and started over.
here's my boo boo #2 on this card.
This is the fun sketch I used: SSSC213
NOTE: I will try and do a post with measurements and pictures if you like.. just let me know.
SUPPLIES:
card stock: Real Red, Brillant Blue, White
pattern paper: Paper Studio Cosmic Whammy
stamps: MFT Complimentary Greetings
ink: Versafine Black
accessories: Scor-Pal, Circle Punches, Red Brads, Cropadile, Embossing Folder and Dimensionals
thanks for looking ~
have a great airborne day!
God Bless All Our Military.. each and every one of them
Tuesday, April 1, 2014
Making 6 "MERRY CHRISTMAS" cards for the month of April.. Details/Measurements Included
I made the card above last night... Merry Christmas Card... today I made 6 more.. here is how I did it.
This is going to be a long post.. Lots of pictures.
Here is the sketch I used ~ which happens to be an OWH #218 Sketch:
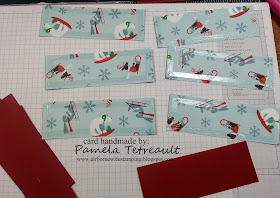
First I cut all my layers.. After I make one card that I like and want to make more, I always start cutting all the layers. I knew I had a lot to do this afternoon and so I opted to make just 6, but I usually make at least 12-20 more more.. I usually always use these same steps and find the cards get done rather quickly.
Just a tip.. when I was cutting the strips.. after I've cut them on the short side.. I put several of them in the trimmer and make one cut to cut them on the long side. I don't always do this, because sometimes I forget.. but today I remembered.
After cutting everything.. I started with my layers.. and first thing is I score all my card bases. I use a Scor-Pal. I have three of these.. two large size ones.. a first edition and then the second.. and my mother bought me this Scor-Buddy and I have made thousands upon thousands of scores with this baby.. my most used tool beside my trimmer and ATG. If you don't have one of these... I highly recommend getting one.
I am going to emboss all the shimmery white layers using a Tim Holtz Snow Flurries embossing folder.
I do two at a time.. saves me time and they both emboss nicely.
Just wanted to share a tip... I recently purchased a Magnetic Platform and removed the top tab off the platform I already owned.. now when I want to use embossing folders, no need to flip the top layer.. just put a clear plate on it, your embossing folder and another clear plate.. saves me so much time.
Since there is a lot of nooks and crannies.. I put adhesive around the outer edges and usually a big X in the middle.
Tip.. just wanted to mention this one blue layer.. I had either punched or die cut a circle out of a piece of it and realized I could use it for a layer on one of the cards because there was enough room between the circle edge and the edge of the card stock.. I only put adhesive around the outside of the shimmery layer that went on this one.. I put some adhesive on the blue layer. This way I didn't have adhesive sticking out the back of the shimmery layer and sticking to everything. I do this quite often.. especially if my card had a punched out shape or die cut shape and it's in the same color as a layer that will be covered up.
I was asked the other day how I get my layers straight.. I hold the sides with my fingers.. lining up the bottom and then glancing to see that the top is the same.. then I lay the layer down.. making sure to push down on the left and right side because my fingers can cause the paper to curve a little bit.
When I am putting adhesive on the layers.. I put it on either all of them at one time.. or if I am making a whole bunch, I usually do them 5-10 at a time.. this makes putting the layers together go much more faster.
Next I stamped all my sentiments onto the shimmery white strips. I always lay a piece of dark card stock underneath any white layers I am stamping.
I am going to punch the ends of the two layers to make the banner end.. I line up the two layers and punch them at once.. so that they line up when I slide the white layer over a little bit after punching.
After I punched the ends.. I trimmed some of the white layer off.. then adhered it to the blue strip. I then used scissors to trim some off the end.
here is what the sentiment strip looks like after stamping, punching and trimming.
After I have got all my layers together.. it's time to assemble the cards:
First I adhere the green swirly layered piece on the front of the embossed layer, near the bottom of the layer. I burnish (rub on it) to make sure it sticks together good.
I put my favorite thing in the crafting world on the back of the square panel.. Dimensionals!! These happen to be ones from Stampin' UP! love them things!!!
Then I put the square layer on the card.. more to the right side on the card front.
I move on to the sentiment layers.. I put a dimensional on the banner end and adhesive on the other.
Putting it on the card front..
Next I punch all three holes for the brads.. I punch the hole in the center first and then to the left and right.. usually right then left.
Putting three brads in the holes and adhering the card front to the card base.
and all the cards are complete. I hope you give it a try.. using any sketch and theme for some cards.
SUPPLIES:
card stock: Shimmer White, Cherry Cobbler and Midnight Muse
pattern paper: American Crafts Red Sleigh (scored at Tuesday Morning)
ink: Cherry Cobbler
stamps: MFT Christmas
accessories: Scor-Pal, Tim Holtz Embossing Folder Snow Flurries, Photo Corner Punch, Hole Punch, Red Brads and Dimensionals.
thanks for looking ~
have a great airborne day!
God Bless All Our Military.. each and every one of them